
All of the Price/Inventory records from Vendor that represent services included in a tour come together in Package.
As explained in Chapter 4, every Tour Master record will have at least one, and more likely several, Packages linked to it.
In the previous chapter, the relationship between TM and Package was demonstrated using a cruise as an example, given you need a means to offer different cabins at different prices. Similarly, a student tour operator might create one Package for the kids, and a slightly different Package for the chaperones; both of which might include some common elements and each of which will feature services specific to adults or students. Separate Packages not only allow for the possibility of different price points, it also gives you the ability to very specifically account for numbers and charges on the Vendor side for one type of service or another.
To create a Package, begin in TM and click on the “+ Package” button. Initially, the Package will be named and dated the same as your TM record; change either or both if appropriate. By example, if the Package represents a post-tour extension, the begin and end dates will be completely different from those of the Package set up for the basic tour.
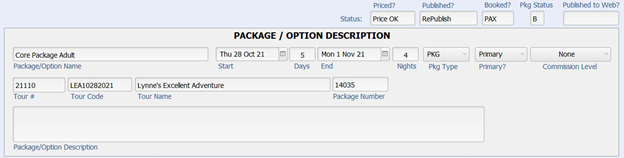
Your Package will initially be “typed” as a PKG but there are alternatives. To explain each type:
AIR: If you want to separately show and bill for the cost of air transportation, create an AIR Package.
BUS: A Package containing just the motorcoach component would be classed this way.
CRU: As you wish, this can be used to more specifically identify cruise tours (these could also be classed as PKG).
DRVR: Use to identify the Package containing services that will be used by the driver.
FEE: Any extra charge that you want to bill separately.
INS: There are several ways that insurance can be sold in TourTools™. If the cost of coverage is what might be described as a “flat fee”, in other words not dependent on the cost of arrangements purchased by the traveler, their age, or other factors; then creating one or perhaps several Packages will work for you.
LAND ONLY: This would then be the counterpart to your Air Package; i.e. a bundling of the rest of the tour services in a Package classed LAND ONLY.
OPT: Options which will be available in addition to the basic Package, pre- or post-tour extensions, by example, would be categorized as OPT.
PKG: A standard Package usually containing all components of what might be considered the “core” tour. This may or may not contain air segments.
STDNT: Can be used to identify Packages created specifically for student travelers (which can also be classed as PKG).
STF_DBL/STF_SGL: Use these to identify Packages that will be used by your tour manager or other staff traveling with the group.
Note: When you price a Package typed DRVR or STF SNG/DBL the Selling Price will display as zero, the logic being the driver is rarely and the staff (tour manager) never billed for their travel. In the event they are to be charged, then create Packages classed as PKG for them. To be sure, the Ops records related to these personnel Packages will reflect a cost and therefore the expense is considered as part of your P/L report. What you will not have is a receivable in Bookings.
By default, your Package will also be set as “Primary” in the field so labeled. The alternative is to class the Package as “Other”. To explain the difference, an “Other” can’t be purchased without first confirming a “Primary”; the best example being a shore excursion on a cruise or a pre-tour hotel night. An “Other” Package would never be purchased on its own.
In the field labeled Comm Level, pick from the list of values to indicate the level at which this Package is to be commissioned. What you enter here relates to levels that you have assigned in the Client record of or a Booking related to an agency or a group leader. When the Package is sold to a Client identified as a Master Record or to a Client linked to a Master Record, a commission will calculate in the Booking record.
Before proceeding any further, you might want to already select or de-select the room types you plan to price and sell. Note: If your Package contains a service or services that are per-person, in other words there is no room component only “Dbl/Opt” should be “turned on”.
Building an Itinerary
The next order of business is to build an itinerary, using the services that constitute the Package, and there are two ways to do this. The first method, we’ll call the “Attach”.
From Package, click on the (back to) “< Vendor” button and, once in the Vendor database, find the first Vendor whose services you want to add. It makes some sense to attach records in the order they are going to be presented on tour, in other words, your motorcoach might be added first, followed by your first lunch stop, dinner and then a hotel overnight.
 In the Vendor record, open the Product Date Record and then the Price/Inventory record representing the service in question, or create whatever product you need. Notice in the upper right-hand corner of the layout reference to the Tour and Package that you are building.
 Click on the “Attach” button (located to the right of the details of the Price/Inventory record) to proceed.
What you will see next is the Confirmation screen. If your service is inventoried for a specific date or date range, the Begin and End Date will have set themselves. If that doesn’t happen, you need to set them manually by 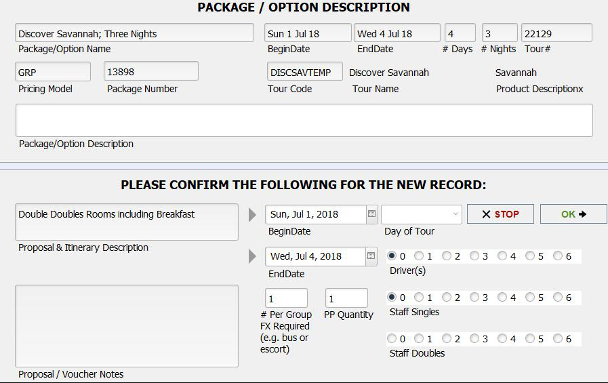 either clicking in the field to type the date, or pick from the calendar. You can also use the Day of Tour pop up. Click the number of the day you want to set as the Begin Date, then click on the load button in front of that field. By default, the End Date will set similarly; if that is not correct, re-set it by repeating the process.
The next thing you want to consider is whether you need to sell multiples of the service. If your service was a lunch voucher, by example, and you wanted to sell three of them without specifically assigning them to three different dates, set the first date and then input “3” in the PP Quantity field. Do the same if the service is a fixed cost item—a motorcoach, by example—by changing the figure that displays in the # Per Group FX Required field.
The series of buttons labeled “Driver(s)”, “Staff Singles” and “Staff Doubles” are all about comps that need to be provided for in your pricing. In our example, the Price/Inventory record about to be attached is for a Room. If you know that the hotel is going to give you a free or discounted room for your driver but not your tour manager, then you may want to click on the “1” button above “Staff Singles” to indicate that when the Package is priced, the cost of a single room needs to be prorated over the paying participants and added to the bottom line as a cost.
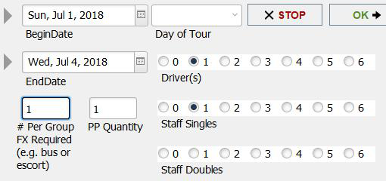 Note: The buttons referenced in the previous paragraph and pictured again on the left will auto populate with the number that has been input in the corresponding field in TM (shown below). If you prefer that they not auto-populate, wait to enter the number of tour personnel/group leaders anticipated on the trip in the TM record until after you finish setting up your Packages.
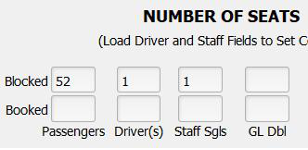
When each of the fields is set correctly, click on the “OK” button. If for any reason you need to back up, just click on “Stop”.
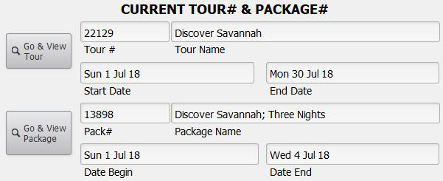
Build the entire itinerary by cycling through Vendor records in this same manner, and once you finish, use the “< Back” button to return to Package. Note that it’s also possible to temporarily return to Package for a quick look at the itinerary by using the button “Go & View Package” in the upper right of the screen. If, for any reason, you want to have a glimpse of the TM record, use the “Go & View Tour” button.
Back on the Itinerary tab in Package, you’ll notice that each Price/Inventory record – now referred to as a “Package Element” – has been assigned an order number. Regardless of the order in which you loaded them, by default, TourTools™ will sort your records by departure date, but you can rearrange same-day services by changing the order numbers. Just overwrite what’s already there, click outside the field, and your records will shuffle. Click the “Omit on Itinerary” button for any services that you don’t want to appear on the proposal or itinerary; tour manager per-diems, by example.
You can also build an itinerary by remaining in Package and going to the tab labeled “List by Name”. What will present is a series of three tabs, inviting your selection by Vendor, Destination, or Destination and Service. Vendor will allow you to select from an alpha list of all suppliers; Destination keys on the Destination loaded in the Product Date Record, and Destination/Service allows a dual pick on the Destination as well as the type of service represented in the Product Date Record.
Once you make your selection, the Price/Inventory records for the Vendor will be visible in the portal below.
The same items that were visible on the Confirmation layout using the “attach” method are here, but their appearance is different. You’ll see there is a Day Pop-Up at the top of the screen, which can be used to load the Start and End dates in the same way, and there are fields to indicate the number of per-person (Quantity) and fixed (# Fixed) items. As explained on the previous page, the fields to the right—labeled Driver, Staff Sng, and Staff Dbl—will be auto-populated from TM. These are the equivalent of the buttons you can select from in Vendor when using the “attach” method and, again, if you don’t want the field to auto-fill, don’t set those values back in TM until after you finish pricing the Package.
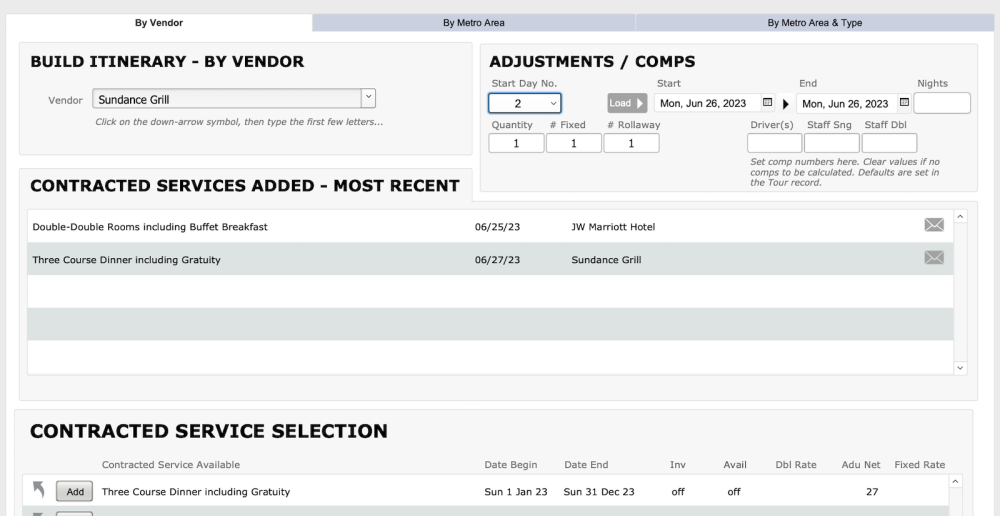
To load the element to the itinerary, simply click on the “Net” or “Set” (the difference between the two price types is explained in Chapter 3) button preceding the description of the Price/Inventory record.
The extra field, labeled Nights (upper right), can be used to load successive hotel nights that have been loaded as individual Price/Inventory records. For example, imagine there are P/I records for overnights on June 25, June 26 and June 27. If we type “3” as the number of nights, set the beginning/ending dates to June 25/26 and select the June 25 price element record, that and the June 26 and June 27 elements will be swept into the itinerary.
Reference the “mini itinerary” on the left to see what’s been loaded. When you finish loading all services, click back on the “Itinerary” tab. Details on what can be viewed there will be addressed shortly; for now, we will move on to pricing.
At the point your itinerary is complete, you are ready to price and publish. On the Itinerary as well as on some of the other screens there is a button labeled “Price” which should be clicked to begin.
Prices Tab (Establishing Selling Prices)
A couple of fields not visible previously are resident on the Prices layout. The Cost Factor has been populated from the Cost field on the front page of TM and can be changed here (the updated figure does not re-populate the field back in TM). This is the number of passengers over which any of your fixed costs will be pro-rated.
If this Package is commissionable, enter a percentage in the field labeled Comm. Note: When you enter a percentage here, you are making allowance for the possibility that a commission will be paid on the Package and, more than anything else, setting aside some money for that eventuality. Your entry does not lock in the amount of that percentage; that value is set in Bookings. In other words, you might enter .10 here and over in Bookings pay one re-seller 8% percent and another 12%.
Note, too, that entering a figure here will—in combination with the percentage entered in the Margin field—bump the net cost of all services in the course of establishing a selling price. This is different than the commission question addressed earlier. That entry sets the stage for a commission to be paid on a Booking; here, you are actually setting aside the money needed to cover that payment.
In the Margin field, indicate your margin of profit; again, a decimal entry.
A margin of profit is arrived at by asking the question, if the combined net value of the services that constitute the Package represents 80% (my desired margin of profit being 20%), what figure represents 100%? The calculation that takes place is: 100 / 80 = 1.25. So multiplying $100 in goods x 125%, your selling cost would be $125.
By contrast, a markup is just that…you are simply marking up your net cost by a certain percentage. In that scenario, $100 × 20% = $20; added together your selling cost is $120.
You can see that in the second case, you’ve made $5 less than in the first.

The numbers you see in the fields labeled Comps to Budget in PackEl are populated from the similarly-named fields back in TM and are what you saw as you considered the question of allowing for comps when you linked Price/Inventory records to the itinerary using the “Attach” or “List by Name” process.
When you’re ready to establish your selling prices, click on the Set Price button. The net value of all services—including comp allowances—will be swept to the Net fields, and the combined total of your profit margin and allowance for commission will show in the Profit & Comm fields. The two amounts combined will populate the Sell Prices fields, and the resulting percentage of profit/commission—after rounding—will be reflected in the fields labeled Margin. If you want to adjust the suggested selling prices, enter your preferred amounts in the Adjusted Prices fields, click on the “Adjust” button, and the numbers will refresh.
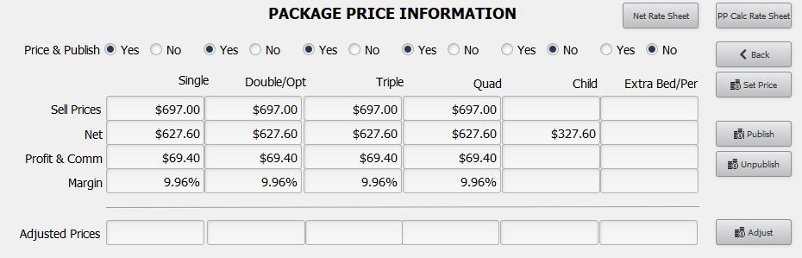
You’ll note that the selling as well as net costs are stored at the bottom of the screen. If you want to make a comparison of prices based on varying passenger counts, simply change the number in the “Cost Factor” field and re-price the Package. When you determine which prices you actually want to lock in, click on the “Select” button to re-load the figures to the active area.

A note about Child pricing: If the Package includes accommodations, the system assumes the child will share a room with their parents and does not sweep any room costs into the price. If any of the Price/Inventory records included in the itinerary have Child prices loaded, those will be used (in the absence of Child prices, the Adult/Student rates from Vendor will be used). Finally, the child will share in the cost of any fixed-cost services.
There is an alternative for calculating the cost of comps needed for your tour personnel, as compared to what was explained as part of the “Attach” or “List by Name” methods, and that is to use the fields you see in the center of the Prices layout.
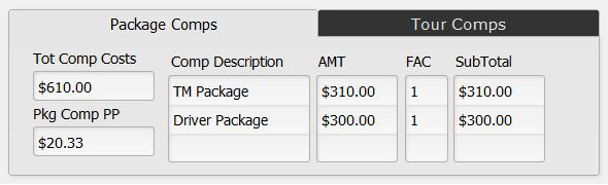
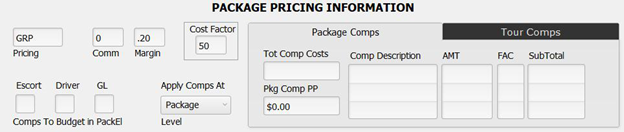
The process goes as follows: As you use either of the two methods to build the itinerary, do not make any allowance for comps. After building the Tour Manager and Driver Packages, reference their costs, and enter them—as shown in the example— on the Package Comps tab of whichever Package(s) need to cover the cost for personnel. This method allows you to pick and choose which Packages will share in these costs but is a little less “sharp pencil” than the alternate approach, given you are not considering and making allowance for the comps that may accrue to you from the Vendor as you attach each individual service to the Package.
Describe the “what” in the Comp Description field, the cost in the Amt field, and indicate “how many” in the Fac field. The SubTotal will calculate automatically, and the total will populate the field labeled Tot Comp Costs. That amount will be prorated over the number indicated in the “Cost Factor” field and the resulting figure, representative of the amount that each paying passenger needs to contribute—will display in the Pkg Comp PP field.
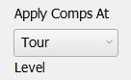 In cases where you have charges that need to be swept into several Packages associated with a particular tour, the procedure differs slightly. The best example of this application is a cruise, where you have multiple Packages representative of various cabin types; all of which have different selling prices and all of which need to include a prorate to cover the escort’s air, port charges and taxes. In such a case, make entries as described above in any one of the Packages records but on the Tour Comps tab. Then enter the total number of travelers over which the cost(s) should be pro-rated in the “Tour Cost Factor” field, set the “Apply Comps At” field to “Tour” and then pick that same value in all other Packages that should share the expense.
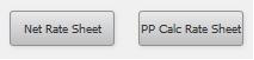 Before signing off on the pricing, you will want to study closely and perhaps print and file these two reports. The Net Rate Sheet reflects data as captured in the Price/Inventory records that make up the Itinerary. Check it carefully to make sure all the entries are correct. The PP Calc Rate Sheet reflects all of the “raw data” from the first sheet, impacted by factors like currency exchange rates, number of persons in a room, number of nights, etc.
Moving on, the last thing you will do is click on the Publish button, which makes the Package available for viewing and sale in Bookings. If you have created multiple Packages, it is possible to publish them all at once by clicking on the button labeled “Publish All Packages 1 Tour”.
After publishing, you will be asked if you want to load Ops records. It is suggested you always answer in the affirmative. Ops records can otherwise be loaded manually using the “Load Ops” button at the top of the screen.
 Also, post-pricing, at the top of the screen, you will see an indication that the Package is “Price OK”. The alternative is a “Re-Price” indicator, which is a tip-off that 1) the Package hasn’t been priced; 2) the itinerary has been altered—something has been added or removed; or 3) the cost of a Package Element has been changed.
Itinerary Tab
As mentioned earlier, you can view and rearrange Package inclusions on this screen. You can also swap out one Vendor service for another using the “Replace” button. When doing so, the original component is deleted, and the List by Name screen will appear. The system assumes you want to replace with a service from the same Vendor, so those choices appear initially, but you can select another Vendor if that is appropriate. The functionality from there is exactly as what you experienced when you built the Package originally.
If a replace is needed simply because you want to change the date, you can use the buttons labeled with the plus and minus signs that precede and follow the start and end dates. In this example, if you wanted the third service to be August 7 instead of August 6, you could click on the + signs as indicated. Obviously, this will work only in cases where the Price/Inventory record has been set up with wide ranging usage dates.
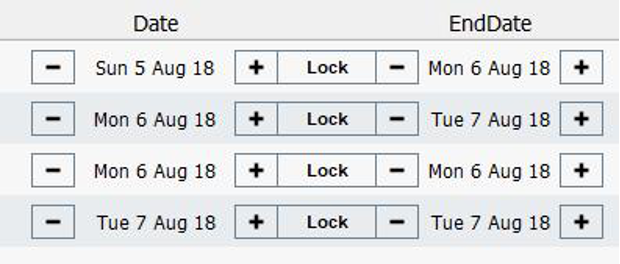 The button between the dates is by default labeled “Lock”. If for whatever reason you want to signal that the date should not be altered, click it (at which point the label will toggle to “Unlock”).
Note: This functionality will not work in instances where the revised date would fall outside the parameters of the Package, if the service has been inventoried back in Vendor, or if Ops records have already been loaded. In such a case, you may be able to do a “Replace”.
The “Delete” button will be used when you simply want to get rid of a Package component.
If you click on the “up-arrow” icon preceding an itinerary entry, you are presented with what is called a “Package Element” record. On the first tab, you can reference some basic information, including the Price/Inventory record to which it is associated. If the service has a per-person or a fixed cost component to it, click the second tab to reference those details. If it is a room record, click the third tab.
Basically, these screens allow you to reference Price/Inventory details without having to go back to Vendor. In addition, numbers having to do with inventory counts in the
Tour or the specific Package are visible, and the fields labeled “Total Using This Vendor Product Item” will show the total of passengers or rooms using/sharing the same Price/Inventory record; not necessarily on just this tour.
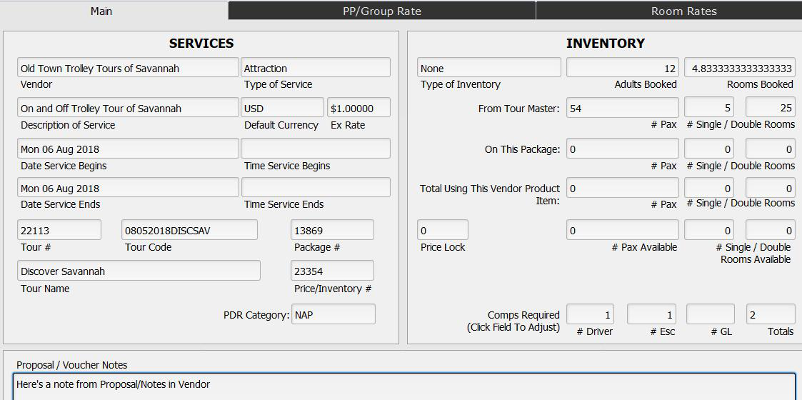
The fields adjacent to the label “Comps Required” reflect the number of comps that were factored in for tour personnel when the particular Price/Inventory record became part of the itinerary. If you want to change these numbers, the fields are open to entry which basically spares you having to go through the process of replacing it in order to change the comp allowance. Be aware that if you do make alterations here, the Package “Priced? Status” will go from OK to “Reprice”, since—as mentioned previously—the change you make affects the selling price.
There are two buttons (beside the one labeled “Continue”) on the top of the screen that are used as follows:

The “Update Exchange” button will be used in instances where the foreign currency exchange rate as originally used to price your Package has changed significantly enough that you want to see the impact on your profit margin. Here, the process is to first update the exchange rate in the “USD (Costing)” field back in Currency, open up the Package Element, and click on the “Update Exchange” button.
“Update Price” will be used in instances where your Vendor cost has significantly changed. After changing the cost in the Price/Inventory record, open the associated Package Element and click on the “Update Price” button to sweep in the revised cost.
Note that any time you do something within Package that affects the selling price, TourTools™ will prompt you to choose between altering the net or the selling cost of the Package. As an example, if a restaurant used in a Package increased the dinner cost by $5.00 and you updated that cost in Package, you would have the option of eating (no pun intended!) the increase or passing it on to your travelers. By picking “Net” at the prompt, your net cost would increase (lowering your profit margin) but your selling price would remain the same. If you opt to increase the selling price, you will be prompted to re-price the Package. In cases where the Package is already published and has been sold, the Package price in any Bookings previously made will be increased.
Note: When these sorts of changes occur, it is your choice to update your Package price or not; it is not absolutely necessary. The choice will have everything to do with how dramatically the change affects your selling price, either positively or negatively. Whatever you choose to do, the price as reflected in a Price/Inventory record in Vendor is the price that will be reflected in Ops as the flow of data from Vendor to Ops is direct.
Policies Tab
 The process of creating a proposal is covered in detail in Chapter 6, but this is where you will load, enter and edit text that will appear on the actual document. If you haven’t already done so, go back to the Home Page Dashboard and click into the Policy Text support file to load what basically amounts to your “terms and conditions”. You will find three fields, labeled “Policy”, “Conditions” and “Options”, which correspond to the three fields here as well as on the actual proposal document; and it is suggested that you load verbiage to cover any and all eventualities. Use the small “load arrows” to pull the text into the three fields here. As usual, any edits you might make here, specific to the Package and proposal you are about to generate, do not alter the text loaded back at the source.
Daily Itinerary Tab
If TourTools™ has been interfaced to your website, this is where text and graphics related to the Package are loaded. The Day Entry field will reflect 1, 2, 3, by example; the Summary Entry will include the highlights of that particular day on tour; in Day Description briefly explain what will happen or what is included that day; and in the Image File Entry you can input an image tied to that day’s itinerary.
If you purchased TourTools Online™, separate, detailed instructions as to its functionality will be provided.
Operations Tab
Upon publishing your Package, Ops records will be created. They can be referenced here and the “up-arrow” button functions as a “hot key”.
Duplicating a Package
There are many instances where one Package will be identical to another with an exception or two. Rather than having to build each from scratch, you are able to use the “Duplicate” function; another huge time saver.
The duplication script will, in a matter of seconds, create an exact copy of the Package for you, which will be tagged with the word “Duplicate” in the name field. Change the name as necessary, and then use the “Replace” or “Delete” buttons on the Itinerary tab to swap out or completely eliminate Package Elements that don’t belong.
A common application of this process will be to create a “core package” that includes all services that constitute the basic tour. Once that itinerary is built, you are able to duplicate the Package and strip out or add services that you need to provide to the tour manager accompanying the group. Once that Package is complete, duplicate it to account for the services that the driver requires.
Reports Menu
These reports are available from Package:
Print Proposal: This is the document that can be sent to your client. Before printing you must pick which Packages/ prices you want to appear on the proposal by clicking the “List” button and then selecting the appropriate “Prop Inc” radio button(s).
Package Pax List: This report reflects the names of passengers confirmed on the Package you call it from.
Package Status: This reflects two fields of information from the Prices screen: the “Package Status” as well as “Web Pub Status”, the first representing values of “A” for Active; “B” for Booked”; “P” for Published; and “X” for Expired. By way of explanation, a month after a Package proposal is printed, an expiration date is “stamped” on the record, which date is visible on the Itinerary tab. Note there is really no consequence to that happening.
Tour Element Inventory Report: This report shows what services are included in the Package and the availability of each. This is the same report can be run from Bookings and is usually what you reference when a waitlist occurs.
Print Agreement/Contract: This document can serve as a contract, if one is required, once a proposal is accepted and the tour is ready to be put into operation. As you wish, text appropriate to your operation can be added and will be charged as “customization”.
If you have any questions that are not answered here Contact TourTools Support for assistance.
Post your comment on this topic.