
All primary modules in TourTools have a Detail View. In this view, you can view all of the details related to a particular Tour.
Feature Buttons

List View
Use this button to return to the Tours List View.
+ Tour
Use this button to begin the process of adding a new Tour to your system.
+ Package
Use this button to begin the process of creating a Package to attach to this Tour.

Duplicate Tour
Use this button to initiate the duplication process for this specific Tour. You must first set the Tour Status of the Tour you want to duplicate to “Template”. Click on this link to jump to the section below related to Duplicating a Tour.
Cancel Tour
Use this button to begin the cancellation process for this “-Tour.
eBlast
This button is the gateway to creating an eBlast or marketing campaign to a target either Tour PAX, Tour Vendors, or Tour Hotels. Click this link to see complete details on using the TourTools eBlast Feature in Chapter 1.

< Packages
All buttons with a left pointing triangle will take you to related records. In this case, use this button to jump to the Packages module and show all packages attached to this Tour.
< Bookings
All buttons with a left pointing triangle will take you to related records. In this case, use this button to jump to the Bookings module and show all bookings made on this Tour.
< Client
All buttons with a left pointing triangle will take you to related records. In this case, use this button to jump to the Clients module and show all Clients associated with this Tour.

< Ops
All buttons with a left pointing triangle will take you to related records. In this case, use this button to jump to the Vendor Ops records associated with this Tour.
Find
You can search for one or a group of record(s) by clicking on the “Find” button. Having clicked the button, you will be asked if you want to stay on the current screen or if you want to us the “Find” screen. This second option allows you to search additional fields that are not available on the current screen.
Once you have entered your search criteria, you can simply hit the ENTER key to begin the Find/Search.
New Window
Clicking on the New Window allows you to open other modules within a new window so you can view 2 or 3 at the same time – this is especially helpful if you have more than one display.
Exploring the Tour Details Layout
To keep things simple, we’re going to address first of all the information seen on the top half of the Tour record. After that, we’ll go tab by tab through the bottom section.
Most of the fields are obvious as to the content.
Guaranteed is a “yes/no” indicator of whether the tour will operate regardless of booking activity or any other factor.
As there is booking activity on the tour, a percentage representing the number of active bookings as compared to the anticipated Number of Seats will appear as a percentage in the field labeled Load Factor.
Trip Type is a value list used to indicate if the trip is single or multi day.
Closed is another “yes/no” indicator of whether the trip is open to the general public or is restricted to a closed group.
The field labeled Tour Status will automatically be set to Active when a Tour record is created. Use the “Hold” value to temporarily stop-sell a tour; Non-Op” will be auto-loaded at the point you cancel a tour; “Lost” will be indicative of a lost sale; “Proposal” is the designation for Tour records that have been created for purposes of making a Proposal; and “Template” is the value to set when you want to duplicate the Tour record. Note: The tour code is what you pick initially when making a Booking, and the only ones that will present are those for Tours marked “Active” that are still to travel, i.e. departing later than “today”.
Res Status displays “Avail” until less than 10 days prior to departure, at which point it will revert to “Call”. Note: This field is for reference only and a “Call” status does not prevent a booking being made within that time frame.
Invoice Type is simply an indication of whether invoicing for the tour will be direct to the passengers (Pax) or go via their Group Leader (GL).
Main / Notes Tab

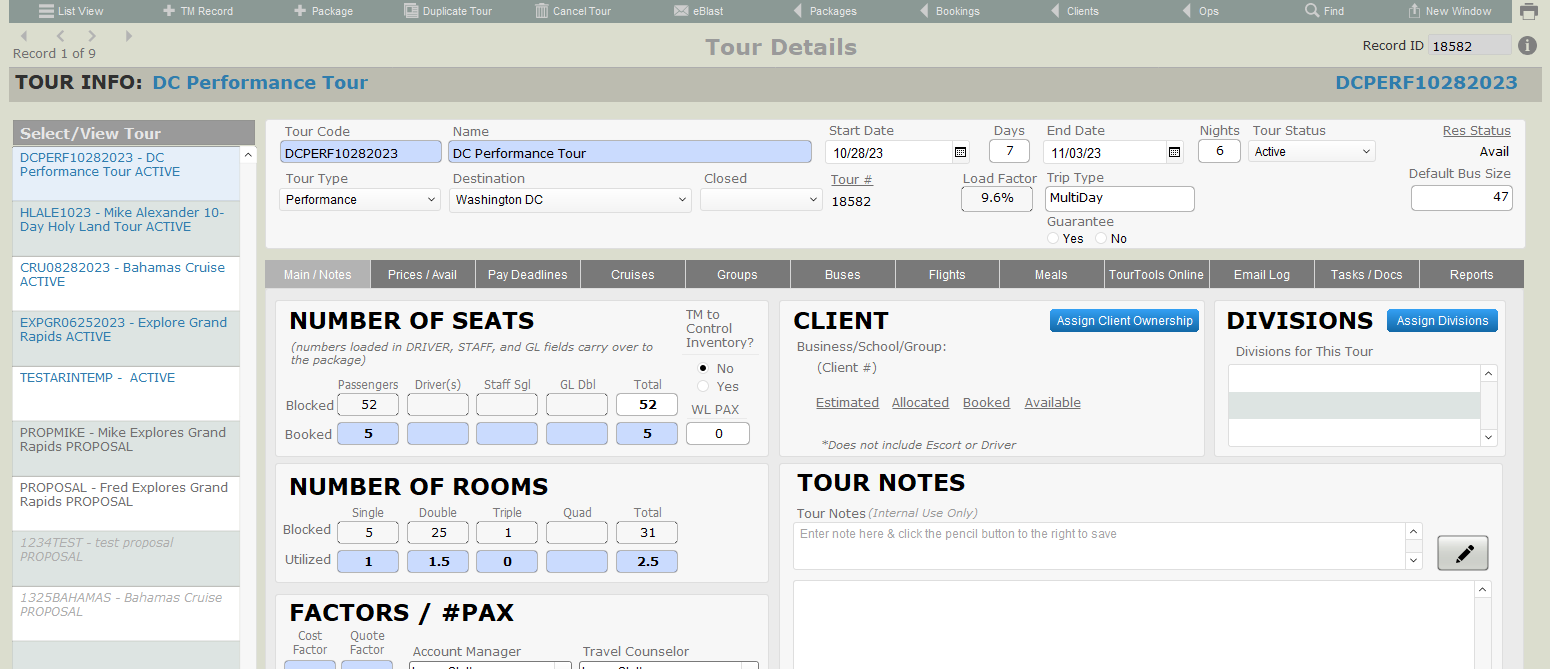
Number of Seats and Number of Rooms
In the Blocked fields, enter the maximum number of Passengers, Driver(s), Staff Singles and GL Doubles you anticipate and can accommodate on this Tour. When you begin making bookings, the gray Utilized fields will reflect the actual number of participants by type that have been booked.
Just below, enter numbers reflective of the rooms you anticipate filling. Eventually, the Utilized fields will populate in the same way.
Inventory Control
A few words about inventory control in TourTools.
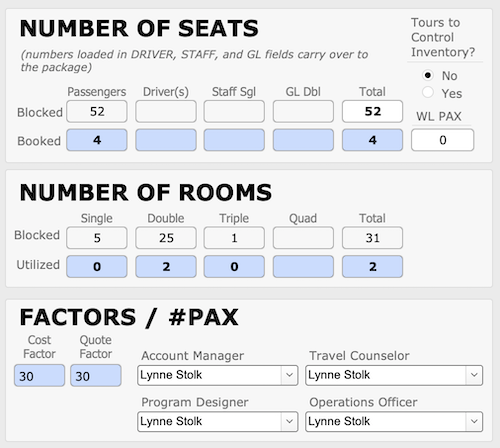
By default, the question of “Tours to Control Inventory?” here in Tours is set to “No.” Left at that, control resides with the various Contracted Service (C/S) records from Vendor that have been linked to Packages related to the Tour in question. Whichever inventoried service that is depleted first will cause a Booking to waitlist.
The alternate choice to control or limit the number of passengers on the Tour is to change that value to “Yes” and let control be dependent on the figures you enter in the Number of Seats fields. In other words, if 40 shows at the Total (number of seats), adding together what has been allocated for Passengers, Drivers and Staff; the 41st Booking will waitlist.
Finally, be aware that if nothing at the Vendor level has been inventoried and the question of whether Tours is controlling inventory has been left at “No,” the Total (number of seat) will nevertheless assume control. To be sure, it is the passenger numbers that are being considered; the room numbers are purely for reference.
If Tours is controlling inventory, any inventory settings at the Vendor level are ignored, meaning a particular Vendor C/S may be oversold and reflect negative availability.
If Tours is NOT set to control inventory, again, control is at the Vendor C/S level, in which case the Number of Seats can actually be exceeded. When a motorcoach is involved, it is suggested a ‘Max Pax’ record be created to inventory the total number of seats on the motorcoach.
Factors / Pax
In the area labeled “Factors, #Pax”, the Cost Factor field reflects the number of travelers the tour cost is based on. In the adjacent Quote Factor field, input the number that you want reflected on the proposal. The numbers may be one and the same, or you may want to indicate a higher Quote figure to give yourself some “wiggle room” to absorb any fluctuations in the price that might occur between the time the trip was priced and put into promotion, and the time it actually operates.
Account Manager/Travel Counselor/Program Designer/Operations Officer: These four fields are linked to the staff names value list and represent who will be handling different aspects of tour development. Use as necessary – we can re-label the fields as needed to represent various roles held for a Tour.
Client Ownership
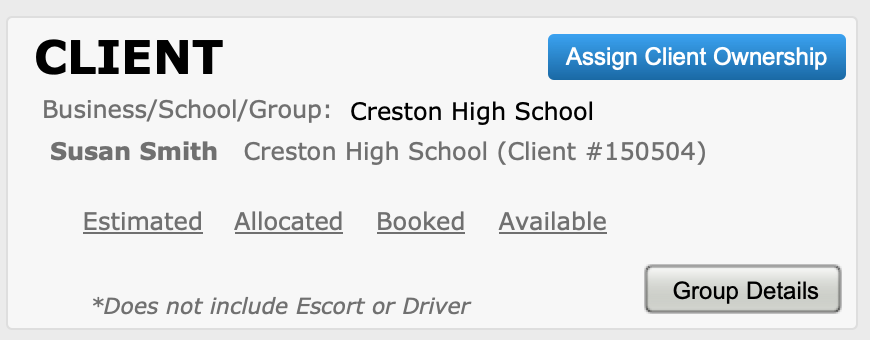
Let’s look at a couple of fields and functions that have to do with referencing “ownership” of a part of or an entire departure by a group leader or “re-seller”.
To begin, click the button labeled Assign Client Ownership. This will step you through the process of finding and selecting the Client record of the Group Leader promoting the trip to the Tour.
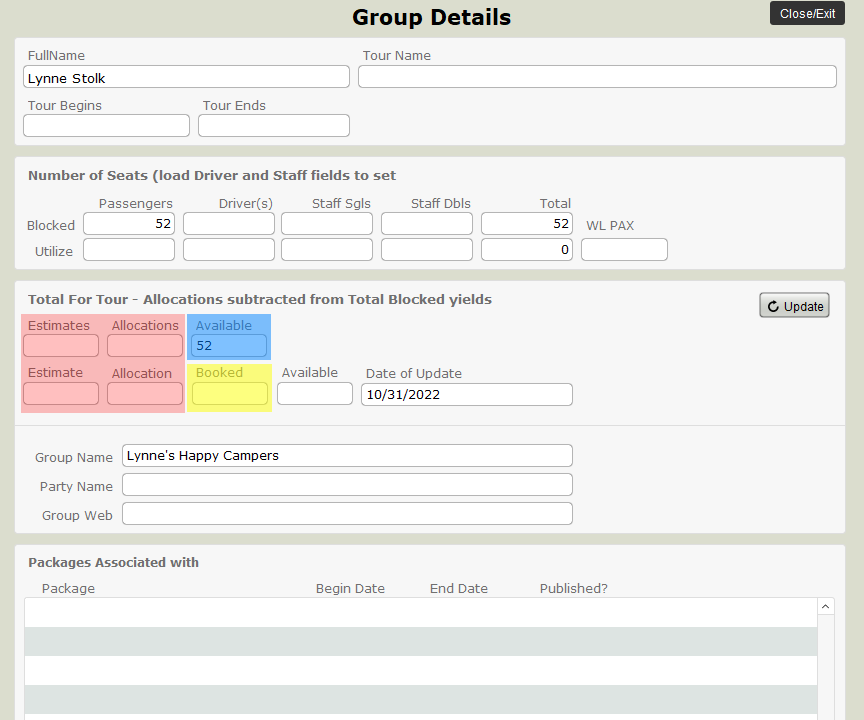
Use the second button, labeled Group Details when more than one Group Leader is selling into the trip. Having done so, you will be presented with this layout which can be completed.
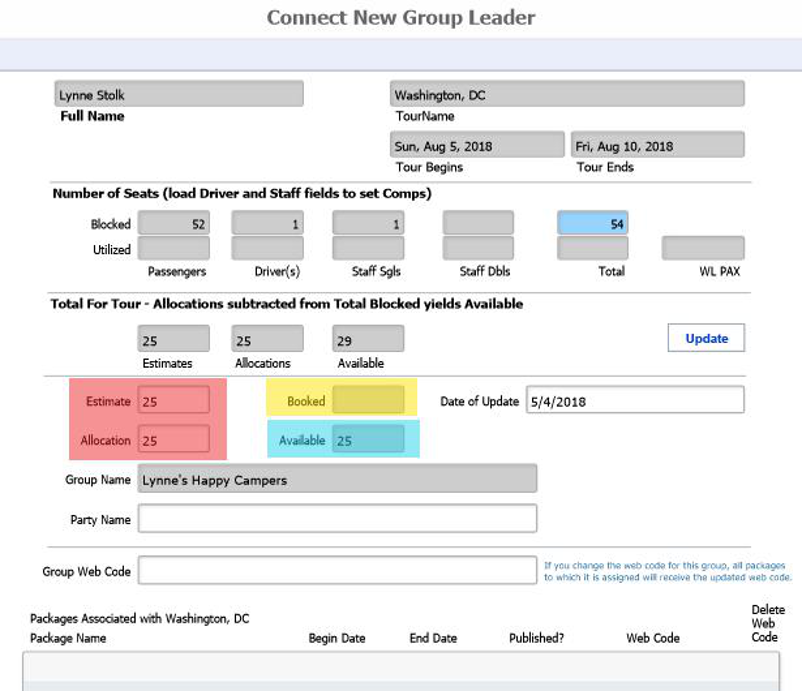
The top part of the screen will reflect details about the tour name, date, and seat totals; and at the bottom, in the fields highlighted in red, you will enter the number of seats estimated to be used by the group. The field highlighted in yellow will eventually reflect how many bookings attributable to the group leader have actually been made, and in the field highlighted in blue you will see an indication of how many of those seats are still available. Clicking on the button labeled “Update” will load today’s date in the “Date of Update” field.
Note that it is possible to associate more than one GL with a Tour. As you do so, they will appear on the Groups tab (and the very first one you add will be stamped on the Main tab of the Tour, as above and below). Any time you want to adjust the numbers or otherwise peek at the details of the re-seller’s record, click on the up-arrow button to the left of the Group Name. Should any one of the GL’s drop out of the tour promotion, you can disassociate them from the Tour by opening their record and using the “Delete” button you’ll see at the top of the layout. Note: It is important to realize that this process does not protect seats for any of your promoters, it is simply a reference as to “promises made”. If you want to actually take seats out of inventory, you will want to set up a GL Booking record (covered in Chapter 7).
Back on the main Detail View of the Tour, you are able to reference the number of GL’s associated with the trip, and the total of seats have been estimated and allocated.
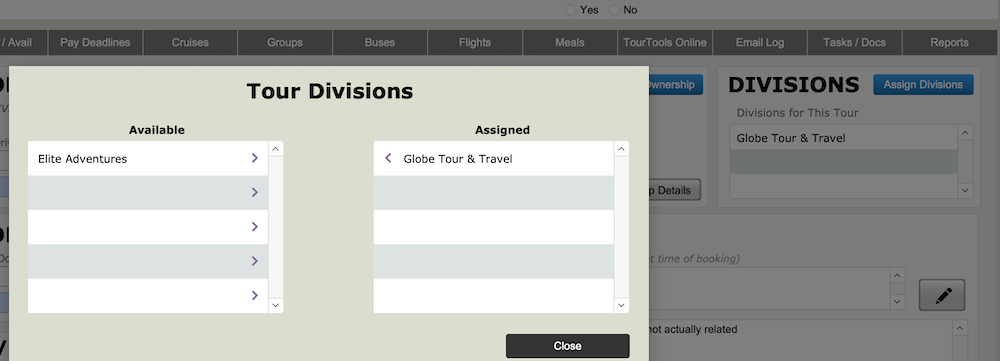
Divisions

If your company has multiple divisions or brands, it is possible to have the name, address, contact information—even logo, as needed—for each one loaded in TourTools. In the Division field, pick from the values that present to identify the “banner” under which the tour will operate.
Click on this link to jump back to the details about Setting Up Multiple Divisions for your TourTools system in Chapter 1.
Confirmed Guides
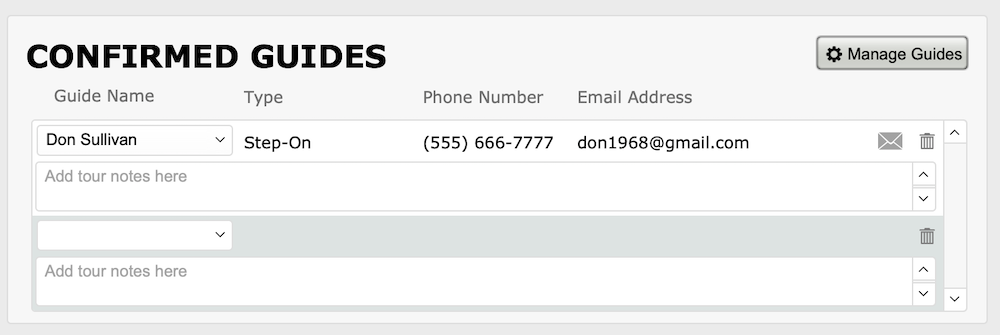
This area allows you to assign Guides for the Tour and creates an opportunity for reporting on Guides and their activity/availability. This information can also be added to documents, as desired, to provide Guide contact details to your travelers.
Guides are added to your TourTools system much like Staff members – to add a guide navigate to Settings > Business Settings > Guides.
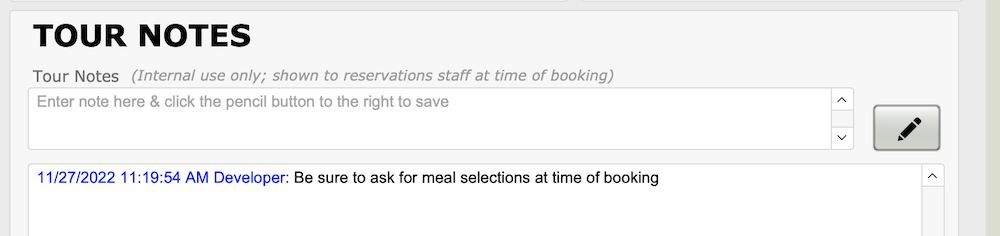
Tour Notes
This area is for notes about the tour, especially notes you want the reservations staff to see when they make bookings. For instance, if you need to ask for special information — such as a meal choice or whether the traveler has a current passport — when taking a booking, this is a good place to put that reminder.
Prices / Avail Tab

Once you publish a Package or Packages (explained in Chapter 5), their iterations will be visible on this screen. In this example, the four listed are type “PKG” and priced for single, double, triple, and quad.
If the Package contains Contracted Service records inventoried on a per person level, you will see a reflection of the lowest number of inventoried product reflected in the column labeled “Inv Blk”. The “Sold” column adjacent will show the total sold, and the Sts Av. column reflects the number still available. When there are inventoried rooms in the Package, you see the lowest inventoried record represented in the Sgl Av. and Dbl Av. columns.
Pay Deadlines Tab
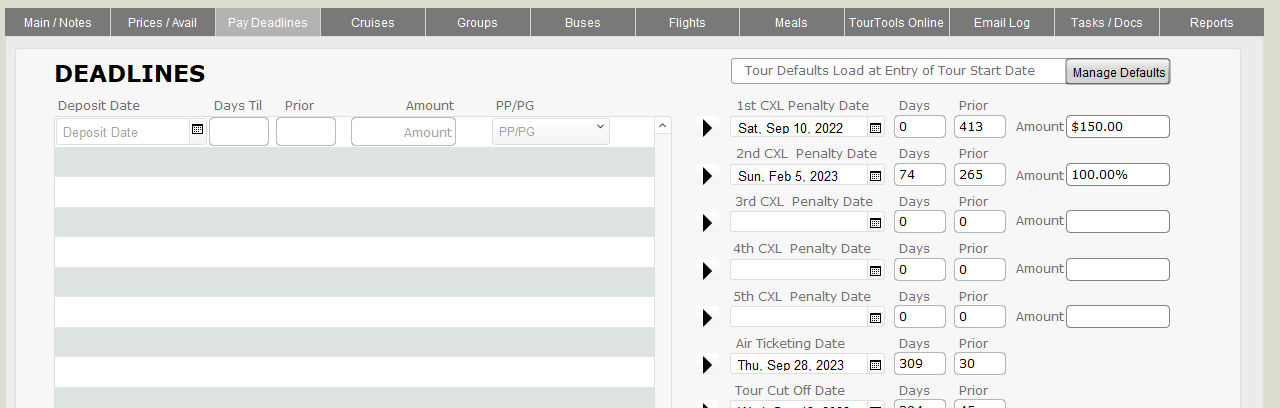
Two types of booking deadlines are established here; those related to payments due — on the left side — and those related to cancellation penalties, over on the right.
If your payment and cancellation deadlines and amounts tend to be the same for each tour, it is possible to set “Business Rules” which will populate the various deadline fields by clicking the Manage Defaults button.
If deadlines are outside the norm, they can be set manually by simply inputting dates and amounts in the appropriate fields, or you can use the “date calculator.” For example, if your first cancellation date is 120 days prior to departure, type 120 in the Enter # Days Prior field at the bottom right. Then click on the “load button” that precedes First CXL Penalty Date at top right. Doing so will load the actual date, the number of days until that date will roll around, and will reconfirm 120 as the “formula” that was applied to establish the date.
There are two ways to establish your initial deposit date and amount. If you take reservations over the phone and allow a “grace period,” during which the deposit can follow, then click the button labeled “1st Deposit Relative to Booking Date,” enter the number of days of grace in the 1st Deposit Date Factor field, and do not make an entry in the 1st Deposit Date field. If you require a deposit at the time of booking, you can enter “today’s date” (the date you create the Tour record) in that field or, better yet, click the “1st Deposit Relative…” button and set the number of days to zero.
Payment and cancellation amounts can be reflected in dollars or in percentages. For percentages, use .25 to represent 25%, by example; 100% will be input as 1.
All of the payment fields are referenced in the Bookings database. Whenever a payment is not received on time, the delinquent traveler will appear on a “Late Payment List.”
The same is true for cancellation penalties. When a cancellation is processed in Bookings, TourTools™ will calculate the penalty due based on details stored in Tours (which amounts can be overridden for special circumstances). To be sure, the penalty amounts are not cumulative, in other words, the amount associated with the date is what will be charged.
The dates entered in the Cancel Tour By, Air Ticketing and Tour Cut-Off fields are reflected on reports that can be run from the Tours Reports menu.
Cruises Tab
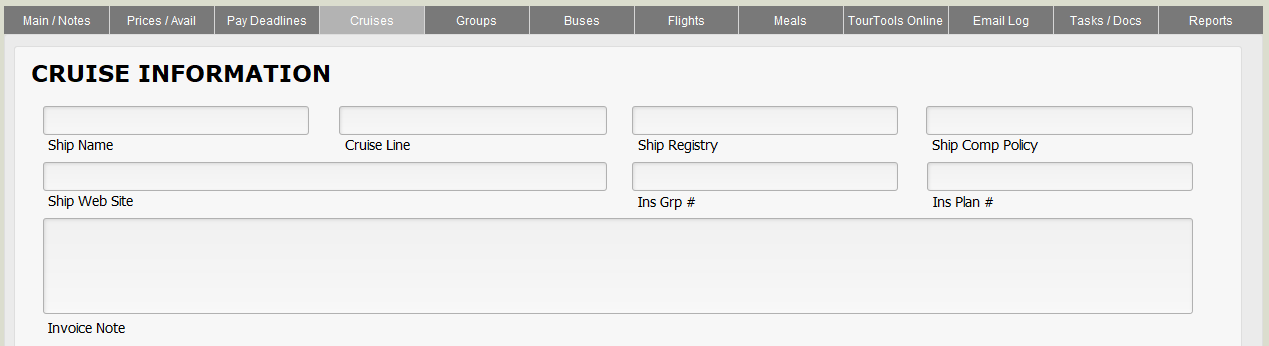
This tab allows you to track and reference important details for the Tour if it happens to be a cruise. This information is pulled into all bookings.
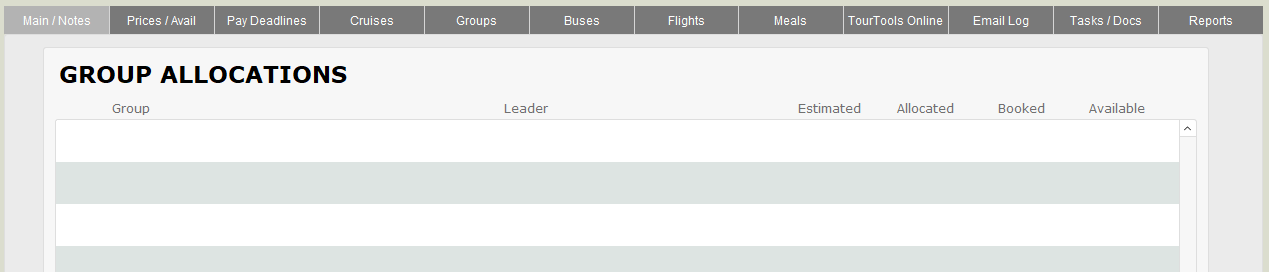
Groups Tab
Primary ownership of the Tour is set on the Main / Notes tab. But it is possible to associate more than one GL with a tour. This is done on the Groups tab. Any time you want to adjust the numbers or otherwise peek at the details of the re-seller’s record, click on the button labeled “Detail”. Should any one of the GL’s drop out of the tour promotion, you can disassociate them from the tour by opening their record and using the “Delete” button you’ll see at the top of the layout. Note: It is important to realize that this process does not protect seats for any of your promoters, it is simply a reference as to “promises made”. If you want to actually take seats out of inventory, you will want to set up a GL Booking record (covered in Chapter 7).
To begin, click the button labeled “Add Group”. This will walk you through the process of finding and selecting the Group Leader’s Client record, after which you’ll be presented with a layout like below.
The top part of the screen will reflect details about the tour name, date, and seat totals; and at the bottom, in the fields highlighted in red, you will enter the number of seats estimated to be used by the group. The field highlighted in yellow will eventually reflect how many bookings attributable to the group leader have actually been made, and in the field highlighted in blue you will see an indication of how many of those seats are still available. Clicking on the button labeled “Update” will load today’s date in the “Date of Update” field.
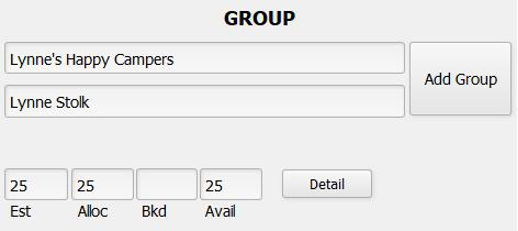 Note that it is possible to associate more than one GL with a tour. As you do so, they will list on the “Groups” tab (and the very first one you tag will be visible on the front page of the Tour record, as seen here). Any time you want to adjust the numbers or otherwise peek at the details of the re-seller’s record, click on the button labeled “Detail”. Should any one of the GL’s drop out of the tour promotion, you can disassociate them from the tour by opening their record and using the “Delete” button you’ll see at the top of the layout.
Back on the Groups tab of Tours, you are able to reference the number of GL’s associated with the trip, and the total of seats have been estimated and allocated.
Buses Tab
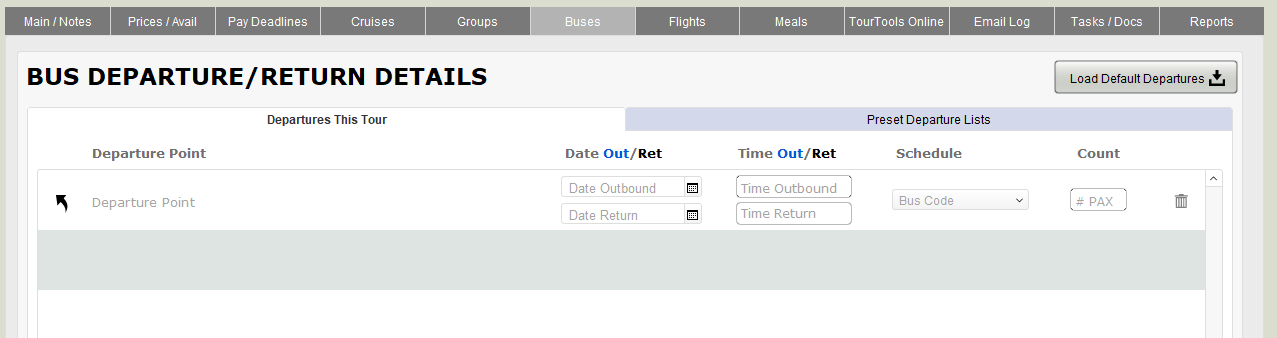
On this tab, details of the motorcoach pick-up and drop-off points and times are maintained. These choices are available to pick from in Bookings and are the basis for the Departure and Return Bus Manifests.
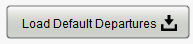 On the right-hand side of the Bus tab, click the button button labeled “Default Departures.”
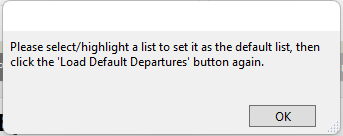
A dialogue box will appear explaining the next steps, click the “OK” button.
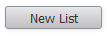 To create your first list, click on the “New List” button in the middle of the new screen, which will invite input of a name or label for the list. Once you have provided same (in our example, “Default Departure Points”), enter your first, second, etc., pick up points in the area just below. If you have regular, established runs, it may be appropriate to already enter times in the “Time Out” and “Time Return” fields. If those change from trip to trip, leave those fields blank until details are finalized.
As fits the need, you are able to create numerous lists, any and all of which are going to be visible to you from any Tour record in the system; in other words, the lists created and maintained on this tab are not unique to one particular tour…not at this juncture anyway. As the lists begin to stack up, open up any one to view details by simply clicking on its name. If edits are in order, simply add stops as appropriate or use the small trash can icon to delete a stop that is no longer needed. Clicking on the “Clear Display” button will temporarily clear the bottom portal.
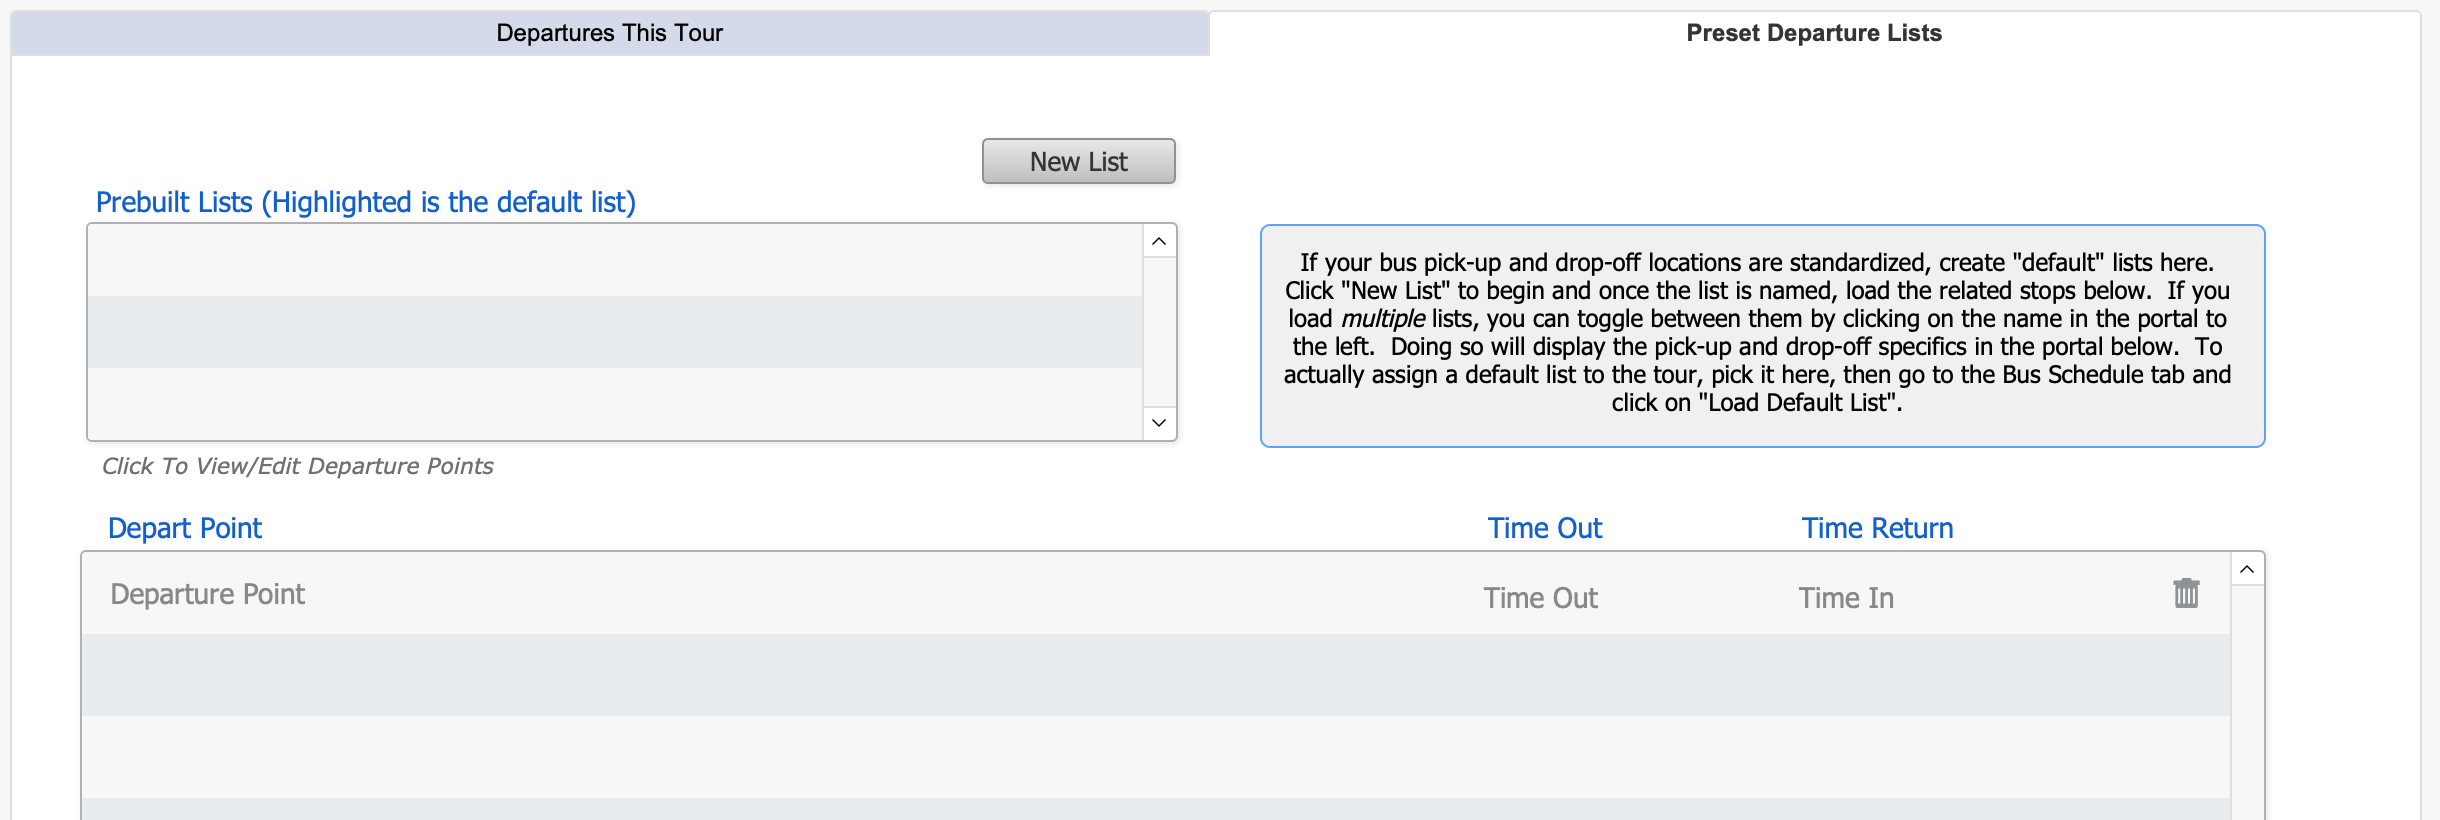 To actually attach one of these default lists to the tour in question, click on the list name to identify the desired list from this screen, then return to the Bus Schedule tab and click on the button labeled “Load Default List”. It is here that you will eventually assign pick up and drop off times that relate specifically to this tour; probably shortly before you produce final trip documents. As needed, colors can be assigned to the schedules, “Green Bus”, “Red Bus”, by example; which values are maintained in the Tour Bus Codes list, accessible via the File Maker menu choice File > Manage > Value Lists (available only to specific password holders). As mentioned earlier, you will be able to assign passengers to these schedules in Bookings.
Click on the button that looks like a small pencil to the right of each segment to log additional information related to the pick-up/drop-off location. For example, you may choose to enter the address and possibly a telephone number at the location, or directional details for the driver. If for some reason any one of the values from the list that has been associated with the tour is not appropriate this one time, it can be deleted by clicking on the trash can button (which change does not affect the default list itself).
Flights Tab

If the tour includes flight arrangements common to every passenger or specific to individuals, it is suggested you load the itinerary here in Tours. Be aware that it’s also possible to create common, as well as individualized, itineraries in Bookings.
Here’s the process in Tours:
Begin by clicking the “Clear” button if there is extraneous data in any of the fields, then click on the “Depart” button to load the departure date of the tour. Add information in the fields as shown below (the “Date Offset” is for a 1 or a -1 if the flight crosses an international dateline). The codes needed for the airports and the airlines need to be pre-loaded in the Support File named Airport Codes, found on the Home page.
To load the return schedule, repeat the process; this time using the “Return” button to begin, and again assigning the color and PNR as loaded in the outbound segments.
As you finish with each segment entry, click on “Load” and the schedule will move to the portal below.
All segments that are part of a multi-leg itinerary should be tagged with the same color and PNR. Doing so will make it possible to confirm the entire flight schedule in Bookings by simply choosing the itinerary color.
If you wish, input the fare in the field so named in one of the related records. Note that if you do, the amount will be added to the balance due in any Booking records to which the flight is linked, thus impacting revenue, but it is not accounted for on the payables side! In order for that to happen, in lieu of adding a cost here, you should create a Contracted Services record (which likely will be “Inventory On”, back in Vendor), which will be linked to a Package which can also be sold to the group members. In that case, there will be an Ops record for the airfare and thus the payable will be accounted for.
Should there be a change to the itinerary after it’s been loaded here in Tours, click on the “Edit” button to make changes which, as you’ll be warned, will impact the itineraries previously linked to Bookings.
Note that the Edit Flight Segment includes a button labeled “Duplicate”. Use that to create a record, by example, for an individual flying the same itinerary as created for the group but on a different date. In such a case, the process would be to dupe the record, change the date(s), assign a new color and a new PNR and “Save”.
Meals Tab
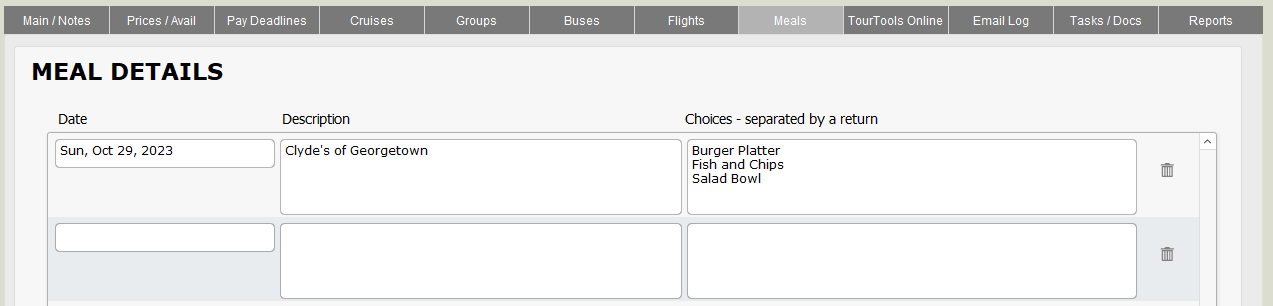
This is where you can record details of scheduled restaurant meals for which you want to solicit menu choices from your individual travelers. Load the date of the meal, some description of the occasion and/or the restaurant name, and the meal choices as indicated. Later, from within the “Pax” record of a Booking related to the trip, you will be able to make menu selections for each traveler. Once that’s been done, there is a report that can be run that reflects everyone’s choices. Note that the portals in Tours and in Pax allow for a maximum of five choices. If you need more, check with TourTools support.
TourTools Online Tab
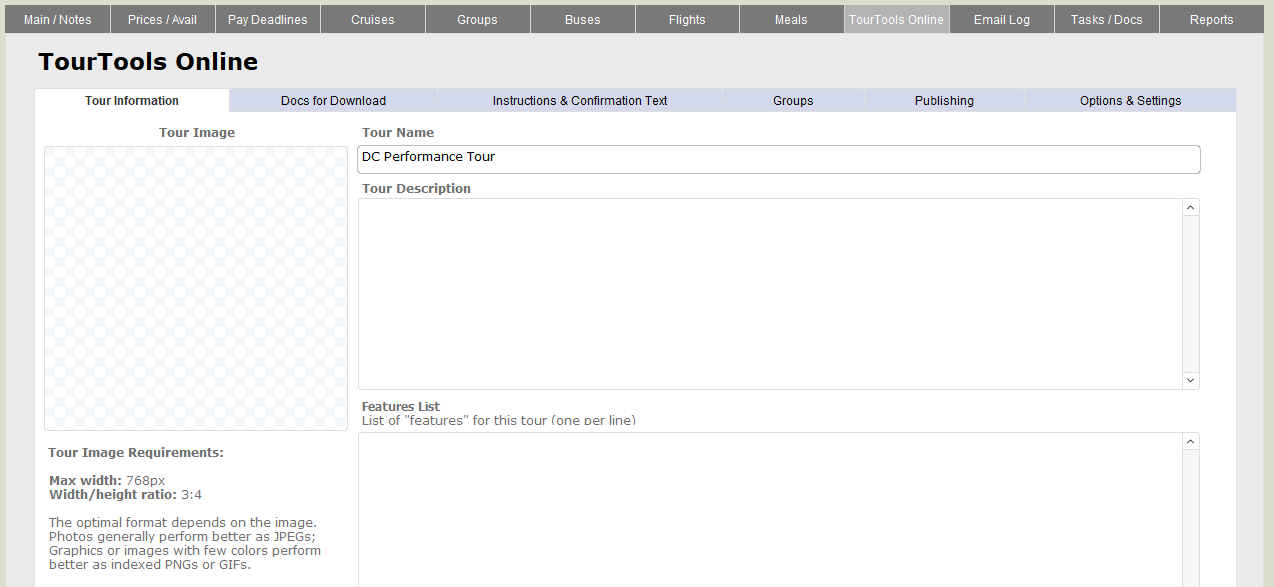
Use this tab to enter data and images related to the Tour that will be appear on your website (if TourTools Online has been enabled for your system). For details on this section, see TourTools Online from Chapter 10.
Email Log Tab
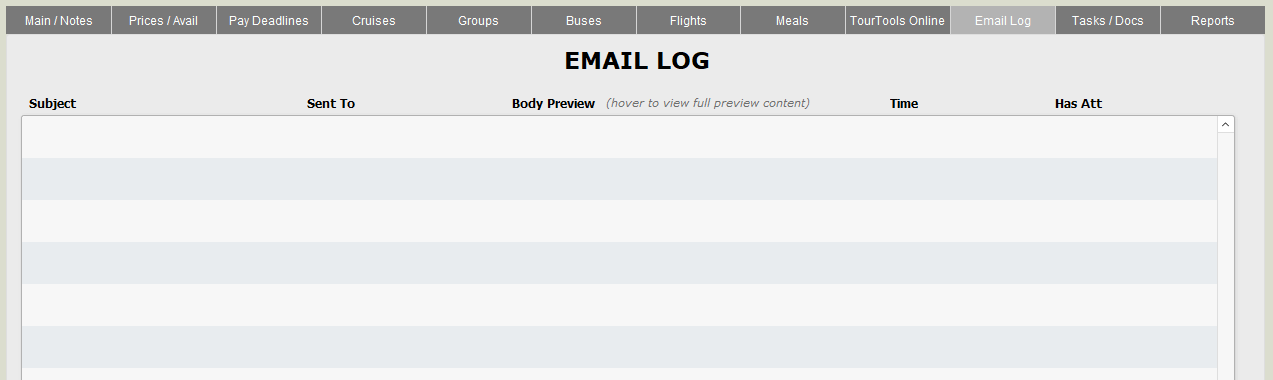
This tab contains a log of emails sent to Tour Passengers and/or Vendors out of TourTools. Hover over the various sections to see additional details. If an attachment was included (and if it was selected to be saved to the Tour record at the time it was sent) you will find that attachment in the Document Library on the Tasks / Docs tab.
Tasks/Docs Tab
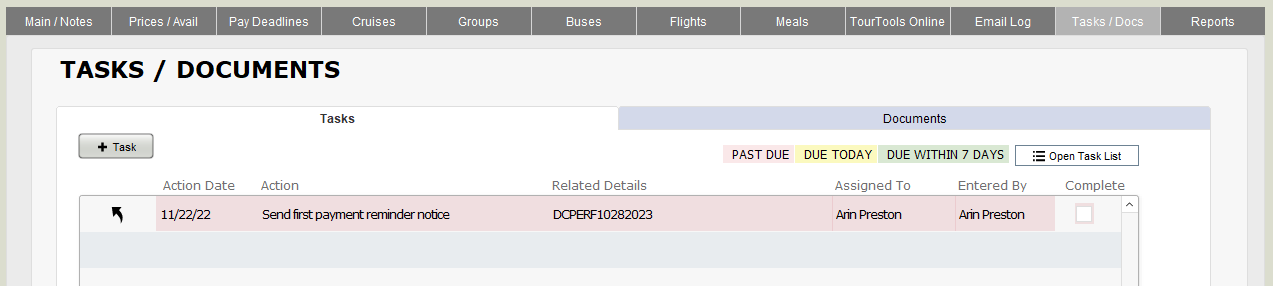
On either tab, click on the “+” button to create a new task or add a new document to the library. As in all modules, the tasks will come find you on your dashboard when the due date approaches.
Reports Tab
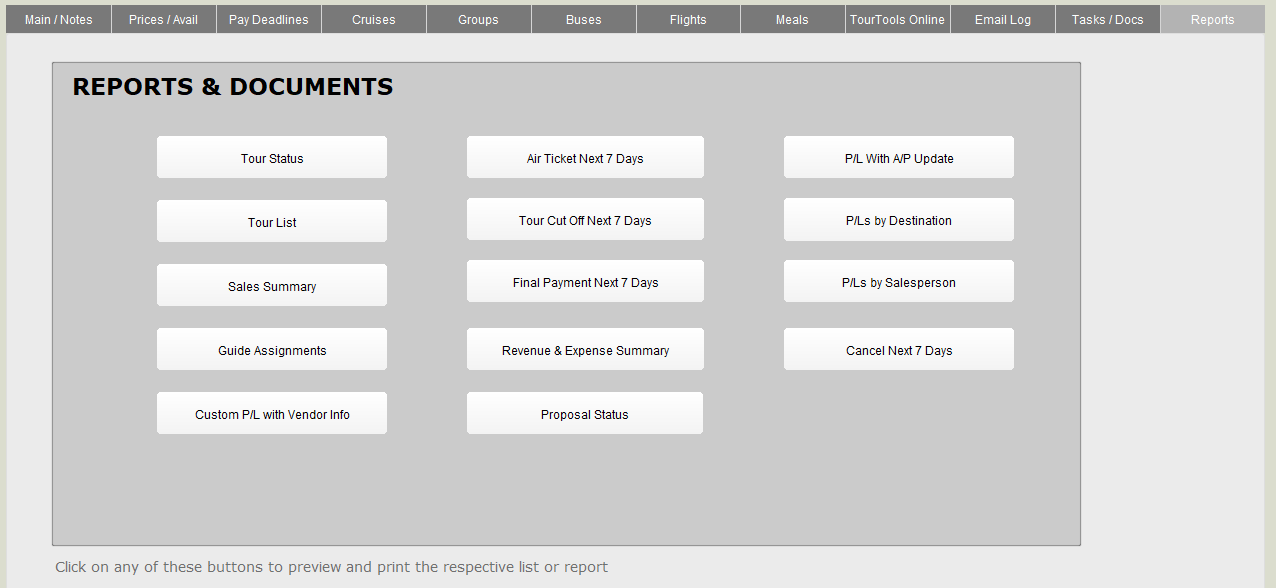
Here you can find all of your reports for the Tour module. Click this link to jump to the section at the end of this chapter related to Tour Reports & Docs.
If you have any questions that are not answered here Contact TourTools Support for assistance.
Post your comment on this topic.